The process to prepare a historical image for laser cutting is slightly more complex and time-intensive than preparing a born-digital image because you will likely have to do some restoration work. If you are new to Photoshop in particular, you will likely have a much easier time creating a laser cut of a digitally produced, purely black and white 2D image than of a historical image, as historical images require touching up that can take some time, especially for those not comfortable yet with Photoshop toolkits. Factor that extra time in when creating historical replications.
Regardless of whether the image you choose is digital or analog-born, make sure that it has clear, relatively thick lines that can be detected by Illustrator and etched by the laser cutter. Hyper-detailed etchings with very thin lines will likely NOT print nicely.
Scan or download the image you intend to create a 3D Print of.
Save the scanned image as a PNG or other hi-res image file.
Most likely, the image of the historical print will include some details of the page as well — things like text, ornamentation, or even unnecessary page space. In Photoshop, extraneous details (text, etc.) can be cropped away if they are outside the image.
In order for the laser cutter to detect the image to be etched, you must convert the full image to either 100% black or 100% white, even it appears to be so already. To do so, in Photoshop with the image selected, go to Image > Adjustments > Black and White.
In the menu that opens up, set each color slider all the way to the right (where it will be white on the color slider bar). This will convert all non-black color to pure white.
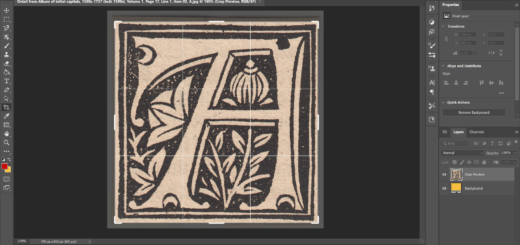
6. At this point, artifacts from prior printing will be more apparent — things like scuff marks, damage, imperfect printing, etc. Use the brush tool set to black or white (based on what sort of touch-up you need to do) to clean up the image, aiming to create an image that replicates what a perfect print would look like. This can take a while with historical images — in fact it is often the most time consuming step of the process. Note the difference between a uncleaned and cleaned image below. Most of the stippling from the archival image has been fixed. The black it was fixed with may not always be the exact tone of the background, but this will be ok once the image is converted to two-color black and white in Illustrator.
Go to Image > Image Rotation > Flip Canvas Horizontal to create a mirror image. This ensures your image will letterpress print the right direction.
Go to Image > Adjustments > Invert to invert the image. The laser cutter will cut away the black portions, leaving the white portions raised. These raised portions of the woodcut will take on ink when letterpress printed, ultimately creating the image on the page.
Export the image as a PNG file by navigating to File > Export > Export As and selecting PNG. When a menu pops up, just click “Export,” the default settings should be fine!
Now, open Adobe Illustrator. Here, you will trace the image so it may be “seen” by the laser cutter. From here on, you will follow the same steps you would follow when preparing a born-digital image.
Create a new 18 x 24 inch Illustrator file. The laser cutter’s bed is 18 by 24 inches; making the file the same size ensures your image will be cut at the proper scale.
Navigate to File > Place to place the PNG of the image you’ve edited onto the file.
Navigate to Object > Image Trace > Make.
This will create a basic trace. To tweak the tracing, go to the right column. There are multiple presets available, but the one that will give you the highest quality trace is typically “High Fidelity Photo.”
Once the image has been processed using the High Fidelity Photo preset, open the Image Trace panel by clicking the box with white lines in it.
A menu will open up. First, adjust the “Mode” to be “Black and White.” Even if the image appears to be fully black and white, there may be shades of gray that need to be resolved to pure black so that laser cutting can occur. Adjust sliders and settings in order to generate a tracing as similar to the initial image as possible. This process is generally one with a lot of tweaking and trial and error. When dealing with historical images, you may find yourself striving to achieve what you think the image once looked like, rather than what it looks like currently due to wear and tear or past printing issues.
When done, close the menu and click “expand” in the right hand column. This will finalize the trace.
You will now have a pure, solidly blocked, black and white vector image. Resize the image to the desired height – 1 inch equals 72 pt font – using transform in the top right corner. The width should scale with the height; height is important here for consistency with other pieces of type.
Move the image to the top left corner of the artboard to ensure it is cut properly.
Save the image as an Illustrator Legacy file, which can be read by the laser cutter. Select Save As > Illustrator, and in the pop up window that appears, select “Illustrator CC (Legacy)” on the drop down menu. Your image is now ready to be engraved on the laser cutter!
Now you have a vector image file ready for engraving wood in a laser cutter. Your next steps may vary depending on your situation, but Northeastern Huskiana affiliates can reach out to the CAMD Makerspace with their file ready to request to make a laser engraving.